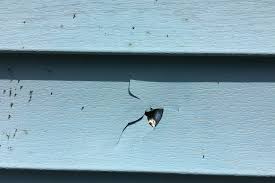
Maintaining the exterior of your home is essential for protecting it from the elements and keeping it looking great. When siding gets damaged, whether it’s from storms, wear and tear, or unexpected accidents, prompt action to repair damaged siding can prevent more significant issues down the line. Luckily, many siding repairs are beginner-friendly and can be done with the right tools and techniques. Here’s a simple guide to repairing your damaged siding.
Signs Your Siding Needs Repair
Before diving into the repair process, identify the damage. Look for:
- Cracks, dents, or holes: Even small openings can allow moisture and pests to enter.
- Warped or loose panels: These can indicate water damage or improper installation.
- Fading or peeling paint: This may signal that the siding’s protective layer has worn away.
- Mold or mildew growth: Visible signs of moisture intrusion often require immediate attention.
Tools and Materials You’ll Need
Before starting, gather these essentials:
- Tools: Caulk gun, utility knife, zip tool, hammer, pry bar, tape measure, and tin snips.
- Materials: Waterproof caulk, replacement siding, paint (if needed), nails, and screws.
Safety first! Wear gloves and safety glasses to protect yourself while working with tools and materials.
Repair Methods Based on Damage Type
1. Fixing Small Holes or Cracks
If the damage is minor, like small holes or divots, a quick patch job with caulk is all you need:
- Clean the Area: Wipe the damaged section with soapy water and let it dry.
- Apply Caulk: Load a caulk gun with waterproof caulk and fill the hole. Slightly overfill to ensure a watertight seal.
- Smooth and Sand: Once the caulk dries (typically within 24 hours), sand it smooth for a seamless finish.
- Paint (Optional): Apply matching paint to blend the repair with the existing siding.
2. Patching Larger Holes or Cracks
For larger areas of damage, a patch provides better protection:
- Clean the Area: Start with a clean surface for optimal adhesion.
- Cut the Patch: Use a utility knife or tin snips to cut a replacement piece slightly larger than the damaged area.
- Attach the Patch: Apply caulk to the edges of the patch and the damaged area. Press the patch into place and secure it.
- Seal and Finish: Let the caulk dry, scrape off any excess, and paint if necessary.
3. Replacing Entire Panels
When the damage is extensive, replacing the entire panel may be necessary:
- Remove the Broken Panel: Use a zip tool to unhook the damaged panel from the surrounding pieces. Remove any nails or screws holding it in place.
- Prepare the New Panel: Measure and cut a replacement panel to match the original size. Leave a slight gap for expansion.
- Install the Panel: Slide the bottom edge of the new panel into place first, then secure it with nails or screws. Use the zip tool to lock the top edge into the siding above.
- Secure the Panels: Ensure all edges are locked and secure to prevent water intrusion.
Tips for Seamless Repairs
- Match Colors: If the replacement siding is noticeably newer, consider taking a piece from a less visible part of your home to use for the repair.
- Weather Considerations: Perform repairs during mild weather to avoid warping or cracking the siding.
- Regular Maintenance: Inspect your siding regularly to catch small issues before they become significant problems.
When to Call a Professional
Some repairs may require expert help, especially if:
- Large areas of siding are damaged.
- Structural components like studs or sheathing are affected.
- The siding is located in a hard-to-reach area.
Keep Your Siding Looking Great
With these straightforward repair methods, you can extend the life of your siding and maintain your home’s curb appeal. Whether you’re patching a small hole or replacing a panel, tackling siding repairs promptly can save you time and money in the long run.
